Pages

Wednesday, January 30, 2013

Traditional Texas Styling


Last week I worked with a client that was in need of some decor styling to pull her living room and kitchen together. She has a very traditional Texas style. Here are some photos of how I pulled it all off on a budget!
 
These curtain rods were already hung by the previous owner so I needed to find a curtain length of 105". And, if you have ever shopped for premade panels longer than 84", you know that they are pretty hard to find. Especially on a budget. When I found these beautiful cranberry red curtains at 94", I couldn't pass them up. So, I bought one extra panel and cut it to sew on the extra length. I then used a rope trim to cover the seam! They turned out beautiful!


The mantel was already on the fireplace, so I added a piece of fabric on top and then styled the decor at different heights.
 
Also in the living room was a built in TV unit. I used many types of decor including books and photos to style each shelf. Here is the before and after.
 
 
In the kitchen, I used a mix of what my client already owned and what I had purchased. This is a before and after of one side of the kitchen.
 

In traditional styling, greenery, plates, and pots play a huge role.

I like to treat each cabinet section as its own and create a small grouping of decor above each one.


And to finish it all off, I made these small valances to top of each window. I found a stripe dupioni silk that had all of the colors from our color palette. We hung them slightly higher than the window to make the window look taller and topped of each valance with a metal scroll piece to draw the eye up!
 
 
I hope you were inspired by this post and got some ideas of your own, whether this is your design style or not!


Friday, January 18, 2013

Gorgeous Transitional Living Room!

Last week I wrapped up a living room design project for a new client! I am so excited to show you all the before and after photos! It took about 6 weeks of shopping and planning, but once I had everything, the room came together beautifully! It has a very neutral pallet of brown, grey, and cream. And the overall feel of the space is transitional (a mix between traditional and modern). I also wanted to play with the balance of masculine and feminine since this is the home of a young married couple. I hope you love it as much as I do!

Here is the space before and the space after. They purchased new leather furniture and the rest was a blank slate! That is my favorite kind of project to do!

Behind the couch I did a small sofa table for lamps. Lamp lighting is HUGE in every space! I never like to turn on those intense overhead lights!

Whenever I am working with leather furniture, I try to soften it by adding as many textiles as I can. In this case, the rug, the tufted ottoman, and pillows played a huge role in making this space warm and inviting!

You can see the rug has a more feminine feel while the curtains look like grey suiting for a more masculine feel. And the ottoman not only is great to put your feet up on after a long day, but it opens for storage! I added a small tray on top for a solid surface to place a drink on.

I used a small rustic wood and metal round side table to act as a barrier between the couch and chair. It is also a great place for a little decor and to hold drinks! 


So, what do you think? 
This entire room was done on a budget too! As a designer, I pride myself on being an excellent bargain shopper and I always treat my clients how I would treat myself when it comes to saving money! With all of the discount stores we have available to us today, there is no need to spend thousands of dollars on one space alone! Design should be accessible to everyone! And I make sure that my personal labor fees fit within your budget as well. So, if you are in the Dallas area, and looking for a savvy, inexpensive interior designer, please email me! jennifer@stylewithwisdom.net
 

Wednesday, January 9, 2013

Custom Airplane Nursery

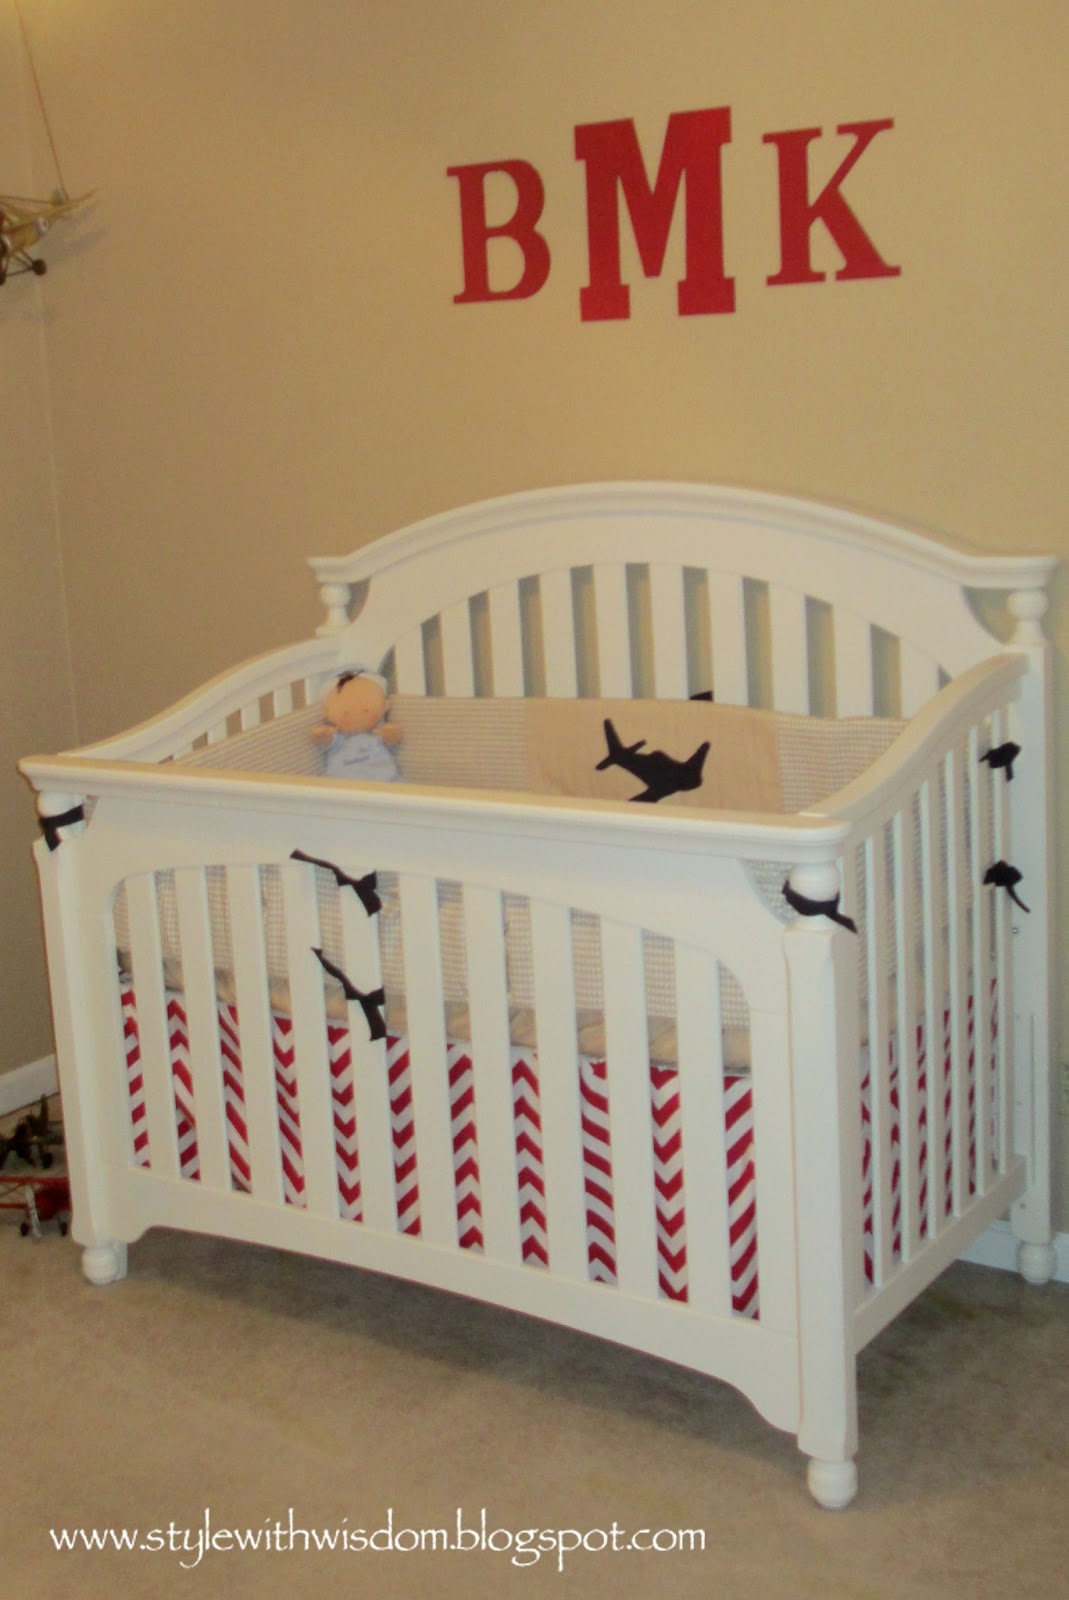
I was recently hired to make custom baby bedding for an Airplane themed boy's nursery. It was such a fun project because I had never done anything with airplanes before. I absolutely love to design nurseries and kids rooms.
I was asked to do a crib bumper and skirt. She wasn't sure what exactly she wanted it to look like, but she knew she wanted something simple and something to do with airplanes. I have a service available for clients like this who are not local. For only $25 I will put together a digital design plan for your custom nursery bedding.
So that is what I did and this is how it all turned out!


Here is the digital design. I decided to go with a red and white chevron skirt and a tan houndstooth bumper accented by a tan linen with a navy blue airplane applique in the center!


I also added navy blue ties to the bumper


I can add any applique you want and in any color or fabric. 


Here is a photo that my client sent me of the crib all put together! So cute!

I have added these photos to my custom nursery bedding listing on Etsy! I can customize your baby bedding any way you'd like! 


Friday, December 21, 2012

Red and White Christmas!

Since we are only days away from Christmas, I wanted to share a few of our decorations to inspire you! This year I chose to do a red and white color scheme. 
 
This is above the TV entertainment center. I like to pull things from around the house such as these white birdcages, and add Christmas decor to them. You can save a lot if you just shop your house first!


On the mantle I had known since October or so that I wanted to reuse the cardboard craft letters that I used for my son's first birthday. I had an O, N, and an E. I decided to buy an L and use a twig wreath for the O. I bought the twig wreath at the dollar store and I already had the empty wood frame. I covered the letters with Christmas scrapbook paper and hung the wreath from the frame with ribbon! It all only cost about $5!!
 

I tend to use this garland with white lights every year. I just love how full it makes the mantle look and it compliments whatever your Christmas decor is for the season!

I also filled a glass jar I had from another room with pine cones, white ornaments, and plastic red rubies.

These small greenery wreaths were another dollar store find. I had 3 of them and planned on using them on our dining table until I was on the ladder decorating our tree and decided to hang them with the left over ribbon from our curtain rod.

This picture doesn't show it too well, but they are so cute!

And of course, I had to share a photo with the lights lit. The tree just looks so much prettier with the lights on!
 
I hope everyone has a very Merry Christmas and a Happy New Year!!
Looking forward to what is in store for Style with Wisdom next year!


Thursday, December 6, 2012

Custom Kids Room Name Signs!

  Now that we know we are having another boy, I have been searching the web for kids room door signs. Our two kids rooms are literally right next to each other and I thought it would be cute to hang each of their names on their own door.
I was really disappointed in what was available for purchase! As most of you know, I am not really into the "corny" baby stuff and most of what I found was just that. Everything had animals, silly fonts, bold colors, etc.
So what does a determined, crafty girl do? Yep, make it herself! I found these small cardboard letters at Hobby Lobby, covered them in scrapbook paper, and glued them together! Once they were done, I used double sided 3M removeable stickers to adhere them to the doors!
I am so happy with the way they turned out and I have had such great feedback from family and friends that I am now offering them in my Etsy store for purchase! Up to 8 letters is only $20!


Since we haven't formally announced baby #2's name yet, here it is!

 
I hope you feel inspired by this DIY project!


Thursday, November 8, 2012

Master Bath Upgrade!

 I know I mentioned that after we finished the master bedroom, we were moving on to the master bath, and we did...but although we finished the big things, it has taken forever to find those perfect smaller pieces to finish off the space. I finally feel like its finished and ready to show you pics and share some awesome tips!!
 
The first thing we did is paint the bathroom to match the bedroom. I always think its best to treat your master suite as one cohesive space. The color is Porpoise by Behr.
I found some beautiful cream print fabric and made some short curtains to sit over the bath.

I found this apothecary sign on clearance at garden ridge and I loved the rustic look. I paired it with 3 capese shell mirrors for a more beachy, classy look. The decorative hand towels are from Anthropology and probably cost more than most items in the bathroom, but they were so perfect I couldn't pass them up. Each room in your home should have something special that makes you feel good.

Candle holders don't always have to hold candles! You can put anything on them. In this case I found these shell balls to place on top of the crystal bases.

We changed out the lighting since our builder put in those horrible beauty bar lights. I chose these inexpensive black fixtures from Lowes. They were about $50 and let me give you an invaluable tip!!!! You can change your lighting out yourself and save yourself TONS of money!! You do not need to hire an electrician and pay upwards of $75 an hour! That's more than my light cost! Just turn off the breaker to that light and follow the instructions that come with the fixture. Normally its as simple as red wire to red wire, white to white, and ground wire (copper) to ground screw. I promise, its so easy!! I did these myself!

The vanities are what we chose when we built the house, so they had to stay as is. Same with the counter tops. And since our mirrors were so big, we decided to add framing to them instead of ripping them down. We bought molding with a small detail on one side, mitered the corners, and used heavy duty mirror adhesive to glue them to the front of the mirror. I then painted them white and we LOVE them! You can do this project for as little as $30!
Tip: There is no rule that says all of your metals have to match...you will see we have brushed nickel, black, and brown.

I bought these frames at the dollar store and found black coral images online. I printed them at home on cardstock and put them in the frames! Voila, $2 art! We removed the towel rings and replaced them with these hooks ($2 ea. at Hobby Lobby).

This is the hubby's side...same thing, just smaller lol.

We removed the towel rack and added this beautiful wrought iron piece from Hobby Lobby ($20). It has towel storage on top and hanging storage below. I love it! I also printed photos of Seaside Beach from one of our recent WA/OR trips and had them printed and wrapped them on canvas!

This is the back wall of the toilet room. Really a room that no one sees but the hubby and I, but it needed something! I added shelves I had stashed in a closet (The Christmas Tree Shops, $5ea). I added a basket for toilet paper storage, some flowers, jars for q-tips and cotton balls, and a larger basket to hold those private/feminine items.

I literally shopped the kitchen section at Target for my under sink organization. This is a wooden plate rack I used to hold all bottles and daily use items. Try walking every ilse in a store like Target and reimagining items for different uses! It can be so much fun!

I bought a wine rack to hold my irons. Since I have 1 straightening iron, and 3 different sized curling irons, I needed something to hold everything! And I love how well this works!

Here is a further back shot from the bedroom looking in.

I found this 5x7 rug at Garden Ridge for $40. I wanted to do a full rug instead of 2 smaller ones in front of each vanity (which is a typical bathroom design). My son is always playing in the bathroom while I get ready and I wanted a soft space for him to play!
 
Ok, so there you have it! I hope you got lots of DIY and inspirational ideas! My main reason for posting about my personal and work projects is to give you all the free advice I can, so I hope I helped someone out there!
We have since moved on to the master closet and I just have one more finishing touch until I can say its finished too! Stay tuned...