Pages

Thursday, February 14, 2013

Cozy Breakfast Nook

Here is a look at a client's breakfast nook I finished a few weeks ago!  


For this small space, we didn't need much. I made a custom bench cushion, added pillows, and window treatments.


This is the before and after of the space

 
We went with a khaki, grey, and light blue color scheme. It is very calming, yet warm and inviting at the same time!

I added 2 darker chairs (since I am not a fan of matchy-matchy furniture).


And a rug helps to define and complete the space!

Thursday, February 7, 2013

Langston's Nursery Reveal!

 So here it is! The long awaited reveal of our baby boy to be's nursery! We are only a few weeks away from getting to meet him and I have been working on this nursery since I was 19 weeks along. I put a lot of time and detail into doing my kid's nurseries. I absolutely love to design kids rooms and this one was so much fun to do!
We went with a nautical theme and very simple color palette of khaki, white, and navy. I hope you love it as much as I do!
 
Here is the room when we first built the house
 
 
and here it is Finished!
 
We started by painting the room a shade of blue/grey on the bottom half and khaki on the top half and ceiling. We added reclaimed fence wood between the colors for a rustic touch. That is one of my favorite design elements in the room.
 
 
Then we added new lighting. This 3-light burlap drum shade light is only $40 from World Market!
 
Here is a photo from World Market's website. We went with this grey color burlap.

We added this fun compass rose decal that I purchased on Etsy. It definitely took time and patience to apply being that we have textured walls, but it turned out awesome! 
 
The rocking chair was in my first son's room and we decided to reuse it in this room. It is white with grey piping.
 
The lamp is from Home Goods, only $29! And the end table used to be in our living room, but we recently redecorated that room, so I just recycled it!
 
The beautiful grey plaid blanket was $30 from Tuesday Morning and the map pillow was only $15 from Ikea!
 
I didn't want to do a traditional changing table and I came across this beautiful server at Garden Ridge. I placed the changing pad on top and covered it with a navy sail boat cover by Nautica. My husband and I bought the mirror at Ikea and added the rope detail (only $30!!!!).
 
You're not going to believe this, but I researched cribs for over a month and we finally fell in love with this one from WALMART! Yep, you read that right! It is two-toned wood, white with an amber base. It is made by a company called Baby Mod. It was only $300 and it came with a free crib mattress! It also shipped free to the store up the street!
 
For the bedding, I went with a store bought sheet (white with tiny blue sail boats) made by Nautica. I then made the skirt and bumper. The little blanket is from H&M, $7. The pillow is from Target, $10.

For the bumper, I went with a linen fabric and trimmed it with a blue and white rope piping. I added the monogram on the back piece for an extra personal touch!


The curtains are white Ikea curtains with grommets, $20/pair. I added the blue stripes by sewing fabric right on top! The toy baskets are from Home Goods, $14ea.
 
Here is a close up of the curtains. Another favorite of mine in the room.
 
Above the crib we used a $5 Ikea shelf with wood brackets. I wrapped the brackets with jute for a more nautical touch.


Next to the door, we needed something large to fill the space, so I made these A-Z nautical letters. They are just cardboard letters from the craft store covered in scrapbook paper!


I even found a nautical paper pack to cover the letters with.
 
In the walk-in closet, we have a small window, so I made this box-pleat valance and added a white ribbon stripe detail.


We also have a small dresser in the closet.
 
Believe it or not, this is the before and after of the dresser. We bought an Ikea Rast $35 dresser and had my friend Stephanie with Something Old~Something New paint and distress it this blue color. We then added the gold knobs and "L" brackets. Didn't it turn out amazing!!?? I am so happy with it!


And finally, the grey chevron rug is from Urban Outfitters, $90-5x7.
 
I am really so happy with everything and I love just walking into the room. Now we just need our baby to complete it all! Can't wait!
 

Wednesday, January 30, 2013

Traditional Texas Styling


Last week I worked with a client that was in need of some decor styling to pull her living room and kitchen together. She has a very traditional Texas style. Here are some photos of how I pulled it all off on a budget!
 
These curtain rods were already hung by the previous owner so I needed to find a curtain length of 105". And, if you have ever shopped for premade panels longer than 84", you know that they are pretty hard to find. Especially on a budget. When I found these beautiful cranberry red curtains at 94", I couldn't pass them up. So, I bought one extra panel and cut it to sew on the extra length. I then used a rope trim to cover the seam! They turned out beautiful!


The mantel was already on the fireplace, so I added a piece of fabric on top and then styled the decor at different heights.
 
Also in the living room was a built in TV unit. I used many types of decor including books and photos to style each shelf. Here is the before and after.
 
 
In the kitchen, I used a mix of what my client already owned and what I had purchased. This is a before and after of one side of the kitchen.
 

In traditional styling, greenery, plates, and pots play a huge role.

I like to treat each cabinet section as its own and create a small grouping of decor above each one.


And to finish it all off, I made these small valances to top of each window. I found a stripe dupioni silk that had all of the colors from our color palette. We hung them slightly higher than the window to make the window look taller and topped of each valance with a metal scroll piece to draw the eye up!
 
 
I hope you were inspired by this post and got some ideas of your own, whether this is your design style or not!


Friday, January 18, 2013

Gorgeous Transitional Living Room!

Last week I wrapped up a living room design project for a new client! I am so excited to show you all the before and after photos! It took about 6 weeks of shopping and planning, but once I had everything, the room came together beautifully! It has a very neutral pallet of brown, grey, and cream. And the overall feel of the space is transitional (a mix between traditional and modern). I also wanted to play with the balance of masculine and feminine since this is the home of a young married couple. I hope you love it as much as I do!

Here is the space before and the space after. They purchased new leather furniture and the rest was a blank slate! That is my favorite kind of project to do!

Behind the couch I did a small sofa table for lamps. Lamp lighting is HUGE in every space! I never like to turn on those intense overhead lights!

Whenever I am working with leather furniture, I try to soften it by adding as many textiles as I can. In this case, the rug, the tufted ottoman, and pillows played a huge role in making this space warm and inviting!

You can see the rug has a more feminine feel while the curtains look like grey suiting for a more masculine feel. And the ottoman not only is great to put your feet up on after a long day, but it opens for storage! I added a small tray on top for a solid surface to place a drink on.

I used a small rustic wood and metal round side table to act as a barrier between the couch and chair. It is also a great place for a little decor and to hold drinks! 


So, what do you think? 
This entire room was done on a budget too! As a designer, I pride myself on being an excellent bargain shopper and I always treat my clients how I would treat myself when it comes to saving money! With all of the discount stores we have available to us today, there is no need to spend thousands of dollars on one space alone! Design should be accessible to everyone! And I make sure that my personal labor fees fit within your budget as well. So, if you are in the Dallas area, and looking for a savvy, inexpensive interior designer, please email me! jennifer@stylewithwisdom.net
 

Wednesday, January 9, 2013

Custom Airplane Nursery

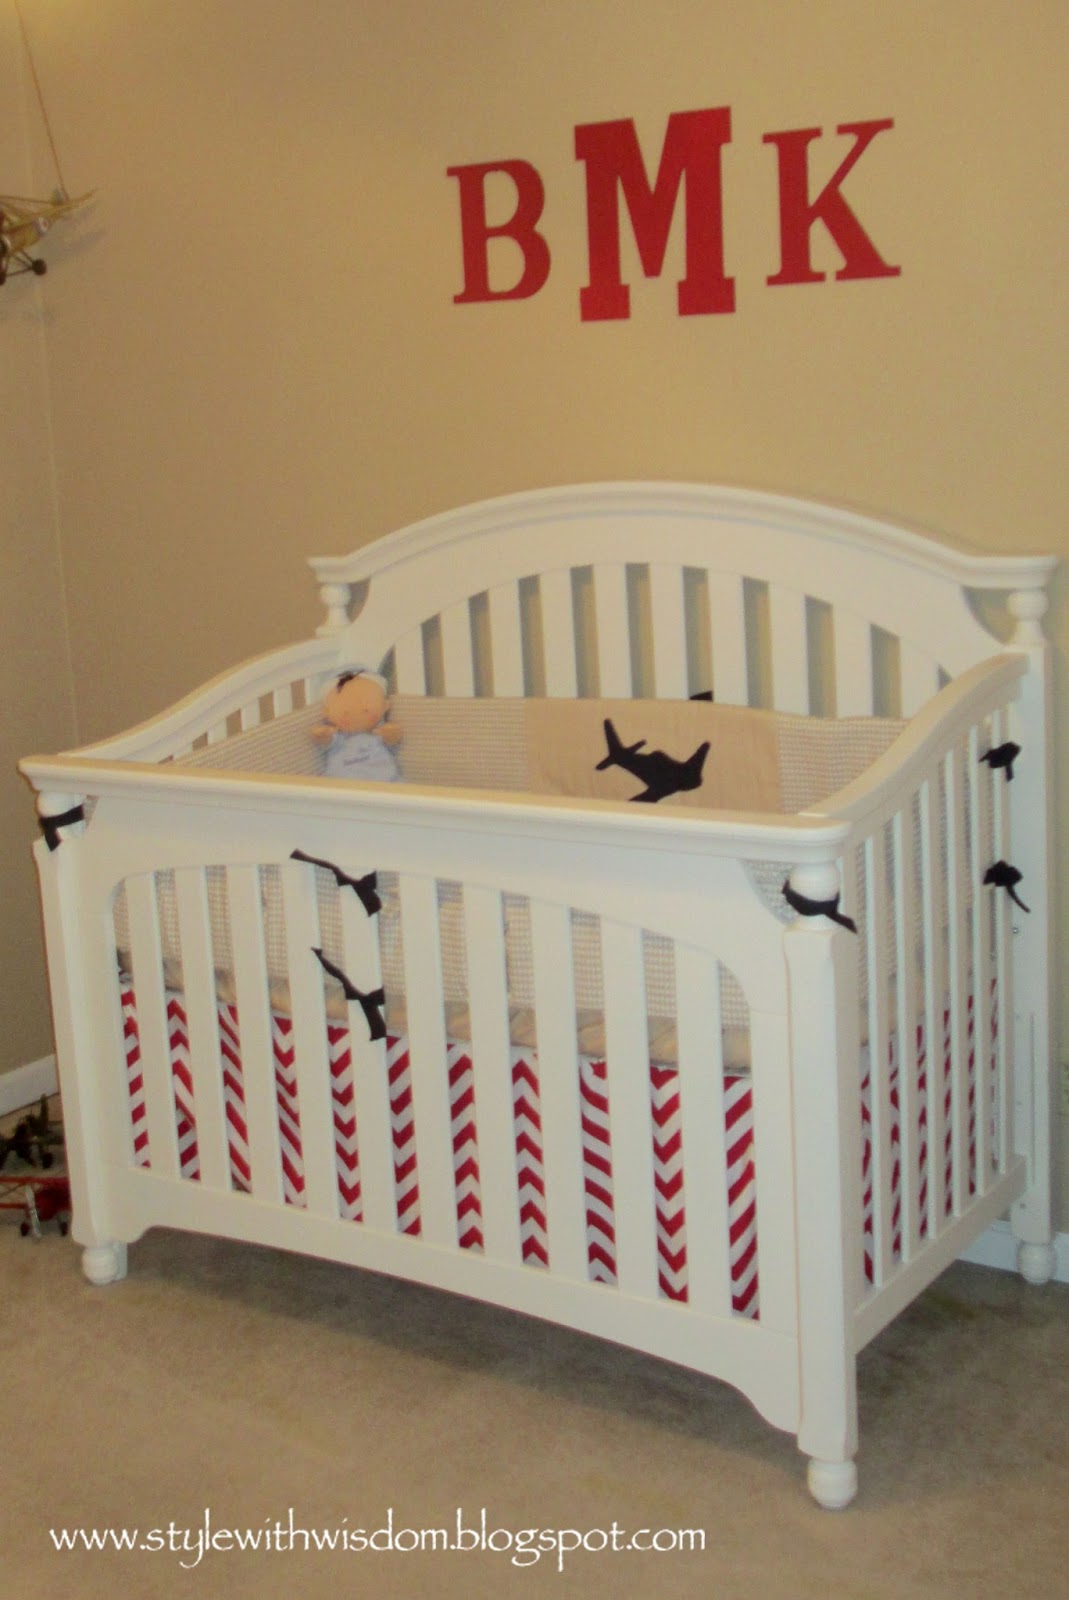
I was recently hired to make custom baby bedding for an Airplane themed boy's nursery. It was such a fun project because I had never done anything with airplanes before. I absolutely love to design nurseries and kids rooms.
I was asked to do a crib bumper and skirt. She wasn't sure what exactly she wanted it to look like, but she knew she wanted something simple and something to do with airplanes. I have a service available for clients like this who are not local. For only $25 I will put together a digital design plan for your custom nursery bedding.
So that is what I did and this is how it all turned out!


Here is the digital design. I decided to go with a red and white chevron skirt and a tan houndstooth bumper accented by a tan linen with a navy blue airplane applique in the center!


I also added navy blue ties to the bumper


I can add any applique you want and in any color or fabric. 


Here is a photo that my client sent me of the crib all put together! So cute!

I have added these photos to my custom nursery bedding listing on Etsy! I can customize your baby bedding any way you'd like!