Yes, I said it, REMOVING wallpaper...
Doesn't the thought of it just make you cringe? What a job! I've heard horror stories about it being so messy, time consuming, and labor intensive! But, guess what? It really wasn't that bad! I am going to take you through step by step on how to remove wallpaper and I hope this will make your project a whole lot easier!
This is a photo of what my master bedroom has looked like for the last 3 years. Pretty, yes. Our style, not so much. Like I have said so many times before when talking about my home, we were so excited to finally own our first home that when we first moved in 3 years ago, we went design crazy in every room! We didn't stop to think about the overall cohesive feel we wanted the home to have. Until now. So now that we have a plan we are working on re-decorating our home room by room. And we have now come to the master bedroom.
I can't express how important it is to decorate your master bedroom!!! Majority of people leave the bedroom for the very last project, if they even touch it at all. In every apartment and home we have ever lived in, the master bedroom is always one of the first rooms to be decorated. Your master should feel like the one room in your house you can retreat to. It should give you a calm, serene feeling. Somewhere to rest and take in a deep breath at the end of a long, exhausting day!
Yes, our room definitely had that feeling, but I just kept wishing that it were more Cape Cod, beachy, and airy. So begins the re-decorating. Starting with removing the wallpaper accent wall...
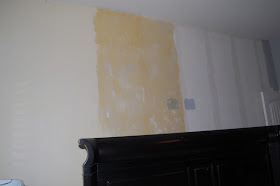
Our wallpaper was put up by rolling on wallpaper glue. So this is the process I found worked best if that is how the wallpaper was applied (not by soaking the strips in water and using the adhesive on the backside of the wallpaper). The first thing I did was peel off the first layer of the paper; the actual printed part of the wallpaper. It will peel off much easier if you always pull from the bottom up. I peeled up a corner and pulled it all off in strips. This left behind a yellowish, thin looking paper that was glued to the wall.
Next I used a spray bottle filled with HOT water and liquid laundry detergent. The hotter the water the better. I sprayed it on 2 strips at a time so that I would have enough time to get those strips down before they dried. Once it was completely soaked, I peeled it up from the bottom in large sheets. You can use a large putty knife to help get your edges up.
It came off so nicely! You can see it revealed my paint swatches from before the wallpaper went up!
This is the wall after all of the wallpaper was removed. You can see where each individual strip was. I allowed the wall to air out and dry for a day before painting.
This color is Porpoise by Behr. It is a pretty good shade of grey, but it changes a little in the light throughout the day. And I got to cheat a little by not having to take the paint all the way to the ceiling because my amazing husband is putting up crown molding this weekend!! YAY! I'm so obsessed with crown molding and hope to one day have it all over the house!
I hope if you are working on a wallpaper removal project that this helps! Keep in mind that my paper was only up for 3 years. Those of you removing paper that has been up for decades or has been painted over, you may find it to be a little more tricky. This will give you a good start though! Good Luck!


.JPG)


.JPG)
.JPG)


